I have been blogging for the past 10 years, working on over 100+ blogs and earning hundreds of thousands of dollars from them.
One of the most common questions I get from people is how to start a blog and make money from it, and if you have the same question, you have landed in the right place.
In this post, I will share my exact process for starting a blog and making it successful from scratch, and this is the same method that has helped me to make 6 figures of income from my blog consistently.
So, grab a coffee and get on the ride to start a money-making blog. This is a long read, so you may forget about this page. Before that happens, make sure to pin this to your relevant Pinterest board!
Journey From College Student to Professional Blogger

My first encounter with blogging happened ten years back when I was in college; all I can say is that this encounter was “Love at First Sight.”
Since then, my passion for blogging has grown, and I have expanded my little-known knowledge into a full-fledged career in blogging.
Before graduating, I started making more money from my Blog than I could ever get into college placement in any big company, all just by working 2 -3 hours per day.
But things were not the same from the start: I still remember the days of college when I struggled to pay my college fees.
The situation was so bad that sometimes I needed to borrow money to pay my fees.
Due to this, I was looking for ways to generate some extra cash. I tried various things, but nothing worked out for me; I felt depressed and hopeless. I heard about blogging from one person when I was in university!
He was the first person to introduce me to the blogging world and told me that I could make money from it.
How did I start my first blogging site and make money from it?
[su_note note_color=”#03c9a9″]You may forget about this page, its always a good idea to bookmark or pin this page to relevant boards like “Make a blog” or “make money blogging”
I’ll keep updating this page, Pin this page to your relevant boards![/su_note]
As mentioned, I got to know about blogging from this guy, but the problem is that he does not have the time to teach everything.
So what next? I dug into this and started researching more about blogging, such as
- How to start a blog and make money from it?
- How much does a blogger make from blogging
- Can I make a full-time income from blogging?
- How long does it take to make money from the Blog?
- What skills do I need to become a successful blogger?
After endless hours of research, here are the first things I discovered about blogging: “Content writing is the core of building a successful blog and making money from it.”
But guess what? My writing skills are worse, so I barely complete my college assignments. Money has become the oxygen for me to survive in college.
As my writing skills were lacking, I decided to find shortcuts to make quick money. I started my first blog in 2012!
That’s the reason my working process is straightforward, which is
- Find the downloaded PDF of the famous books
- Open the blogger dashboard
- Publish some parts from that PDF Book.
Yes, this is the exact process I followed for my first Blog. I was hoping to get AdSense approval ( a way to monetize your Blog), but my application has been rejected more than 50 times.
It was another setback for me, which made me feel demotivated, hopeless, and depressed.
I thought blogging was not for me and that it was time to give up and get a job like other college friends, but my passion for blogging never died.
I restarted my journey, and this time with more experience, and here is what I did after resuming my journey.
- Spend an hour learning about content writing
- Written more than 50 + blog posts on my Blog
- Focused on improving my writing in English
During this process, I found a very helpful tool named Grammarly, which has helped me fix the errors in my writing; some of these errors are
- Grammatical errors
- Spelling error
- Tone of writing
What next? I used the Grammarly tool to write more than 50 Blog posts and got AdSense approval, so my journey of making money has started.
This moment completely changed my life; I never looked back after this.
Here is just a glimpse of the things I have achieved with blogging:
- How I Made $12k with Just 38 blog posts
- Made $130k from one Blog
- Generated $364031.88 from a single blog!
Don’t worry; I will write separate posts to make sure you bookmark this Blog on your tab.
From my experience, anyone can achieve this if they get the proper guidance from the start, and that’s where this ultimate guide for starting blogging comes into play.
Let’s jump directly into starting the Blog and making money from it, even if you know nothing about it.
Why should you start your own blog in 2024?
Now, before I jump into the steps of starting a successful blog, let me address the most important question that comes to the mind of aspiring bloggers.
Here are some life-changing reasons you should consider starting a blog.
Huge Earning Potential
Blogging has been one of the most lucrative ways for people to make money online, and one core reason is that it has huge earning potential.
It simply means that as a blogger, you have different ways to monetize your blog, which increases your overall earnings; here are some of the common ways
- Display advertising
- Affiliate Links
- Sponsored post
- Selling own products
Many bloggers use the above methods and make more than $1000000 per month from a single blog.
I know it may sound ridiculous to many people, but believe me, earning money from a blog is unlimited if you follow the right steps.
Work from Anywhere at Any time
One of the biggest benefits of blogging is that you can work from anywhere in the world — all you need is a laptop and an internet connection.
I personally know many bloggers who work from small places and make millions of dollars per month while spending time with their families.
You may not make millions from your blog yet, but you are still in charge of your time and can decide where and when to work.
Be Your Own Boss
Bogging allows you to be your own boss, and you can decide the number of hours you want to work and the number of days you need to take off from work.
In short, you will make all the decisions, from finding content ideas to writing the content to identifying ways to monetize your blog.
Most importantly, you have no boss, so you don’t need to spend your valuable time on useless meetings all day; you will have all the freedom to work the way you want.
Generate Passive Income
There is no doubt that growing and making your blog successful takes time, dedication, patience, hard work, and the right monetization method.
However, once your website starts getting traffic from Google, you can make money from the blog on autopilot, which means you don’t need to work on it actively.
In my experience, this will give you an edge over the other professions, and eventually, you can use it as a tool to achieve financial freedom in your life.
Opens the Doors of Opportunity
Blogging will not only help you make money, but it will also open the door to opportunities, especially if you become an expert in your niche.
You can get the opportunities to work with the top brands of your niche, build partnerships with industry experts, and, most importantly, get the high-paying job offers.
There is no limit to the things that you can achieve from blogging, but as a blogger, your main focus should always be to help your audience in the best possible way.
In my experience, if you can do this, no one can stop you from becoming successful in the blogging field.
How to start blogging as a beginner?
As you have seen in my story, all I did was: I took the courage to start my first blog, and today, I am able to work from home, earn decent money, and spend more time with my friends and family.
As an experienced blogger, I understand that starting your first blog seems like a daunting task, and you may not know where to begin your journey.
Here is my step-by-step process that you can use to start your blog.
Choose a Profitable Niche
The first step in making your blog successful is: Picking the right niche, the niche you pick you will decide the amount of money you will make from your blog.
It does matter whether you are the most talented writer or marketer in the world; if you choose the wrong niche, then making money from your blog is just your next big dream.
All your hard work and efforts go in vain; if you aren’t in that situation, follow the below framework for selecting the niche; let’s first understand the meaning of the “niche for the blog”
What is a niche for the blog?
In terms of blogging, a niche is a small segment of the big market, but to explain it in simpler terms, it is the specific topic on which you create your blog and write the content.
While choosing the niche, it’s always better to go with the specific topics chasing the broad ones.
For example, instead of choosing a niche like technology (broader market), you can go with the gaming laptop (Specific topic).
Choosing the specific one helps you eliminate competition and increases your chances of success with blogging.
The above definition gives you an idea of the meaning of niche. Now, let’s examine the steps to finding a niche.
Steps to find the niche for the blog
Before sharing my exact method for finding the niche, let me tell you that finding can be the most challenging task, especially if you are a beginner.
Here are the 3 questions that you need to ask yourself before choosing any niche.
1) Are you interested in your niche?
2) Will you be able to write content in that niche?
In other words, if you are interested in something you can write about and other people are searching for it, you can pursue that niche.
Let’s see each of the above questions in detail and help you find the perfect niche to start your blog.
Interest
When choosing the niche for your blog, always choose the niche you are interested in. This can be a laptop, vehicle, piano, dancing, teaching, or any other hobby.
Choosing a niche without your interest can lead to failure as a blogger. You must consistently write about the topic you chose for your blog.
Market Demand
Choosing the niche that suits your interests is a good thing, but you should also demand the market because, in the end, that will help you make money from your blog.
In short, you need to check whether there are enough people searching for your niche or not – If they are searching for it, you can choose that niche.
Ability to write the content
As a blogger, your main job is to write content that solves users’ problems, so ensure that you choose a niche in which you can easily write content.
Choosing a niche based on your interests will help you collect knowledge, and you will be able to write content without any issues.
These are the basic steps to selecting a profitable niche for your blog, but you are still facing issues with niche selection.
Here are popular blog niches you can choose from to start your blog.
- Personal Finance
- Remote Work
- Parenting
- Pet Care
- Online Business
- Travel
- Tech
- Homeschooling
- Specialized Diets (e.g. keto, vegan, paleo)
- Esports/Competitive Gaming
- Home Decor/DIY
One more thing: If you are a beginner, don’t think too much about the niche; just choose what you love the most, and you can write the content, and you will learn as you go.
Select the name of Your Blog
Once you have decided on your niche and the topic you will write about, let’s move on to the important step: choosing your blog name.
In my experience, choosing your blog name is not a big deal, but most people make it very complicated, and beginners get stuck in the loop of finding the perfect blog name.
But let me tell you: there is no such thing as a perfect blog name.
I know when we start something, we always want to make everything perfect but believe me, perfection is nothing but a loop that wastes your energy and time.
Here is my #1 tip – Don’t waste your energy chasing perfection, especially if you are just getting started.
Before choosing any blog name, here are the 3 things that you need to consider.
Relevancy — You should choose a blog name that is relevant to your niche; for example, if your niche is tech, find a domain that is relevant to the tech niche (don’t choose something that is not relevant to your niche)
Easy to Remember – If I had to just give one thing while choosing a blog name, it’s choosing the name that is simple and easy to remember, as it helps people to recall the name of your blog.
Domain Availablity – When you are searching for the blog name, always consider the blog name that is available; if it’s not unavailable, choose something similar.
In essence, don’t spend too much time selecting the blog. It is just part of the process and will not help you make your blog successful.
Choose the Best Blogging platform
Choosing the best blogging platform for your blog is like selecting the foundation of your house as you select the right material to build the foundation of your home so it can provide stability.
Similarly, choosing a reliable platform for blogging helps you ensure it gives your blog stability to attract users to your site.
There are several options available in the market for finding a blogging platform. Some are easy to use, while others require few technical skills and money to get the customization options.
However, there is one platform used by almost all successful bloggers:
WordPress; it is one of the most popular platforms among the blogger community that you use to start your blog.
The best thing about this platform is that it is free to use, and you can learn it very easily without having any technical skills. The blog that you are currently reading is also on WordPress.
Get the Reliable Hosting
As a blogging platform is necessary for your blog, selecting the right hosting also plays a vital role. In fact, without hosting, your website cannot live on the Internet.
It’s like your online space where you store things, or, if I take the example of a house, you can consider hosting as the land where you lay the foundation of your home.
In a similar sense, you need to invest a little money to buy the online space (hosting) for your website, as you pay to buy the land.
To start your blogging journey, you must choose a good hosting provider. The exact process is explained in the next step.
Set up your blog
To set up your blog, the first thing you need is reliable hosting; thankfully,
Hostinger is the official recommendation from WordPress, which comes with affordable web hosting packages that anyone can buy and start their WordPress blog.
Moreover, more than 2 million + website owners mentioned that Hostinger is their first choice when choosing a web hosting plan for their blog.
Not only that, but you also get various things for free if you consider buying their hosting plan; here are the things they offer.
- Free domain name for the first year
- Free SSL certificate for protection
- Single Click WordPress installation
- 24/7 Live Chat Support
- 30 Days money back guarantee
- High Performance than other hosting
Let’s look at the steps to start your blog’s setup process and begin your blogging journey.
Step 1: Choose the hosting Plan
When buying hosting from Hostinger, the first thing you need to do is choose the right hosting plan; here are the steps that you need to follow
- Visit the official website of the hostinger > click on the WordPress > Managed WordPress in the top right corner.
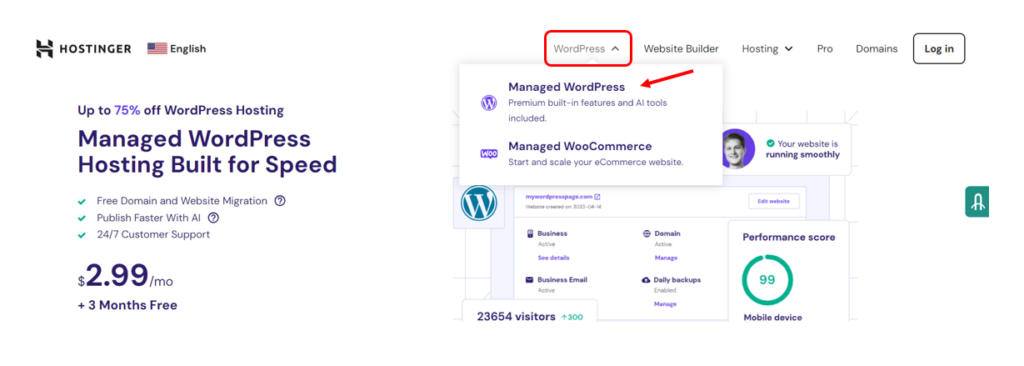
Once you click on web hosting, the next step is choosing the hosting plan, as shown in the image below.
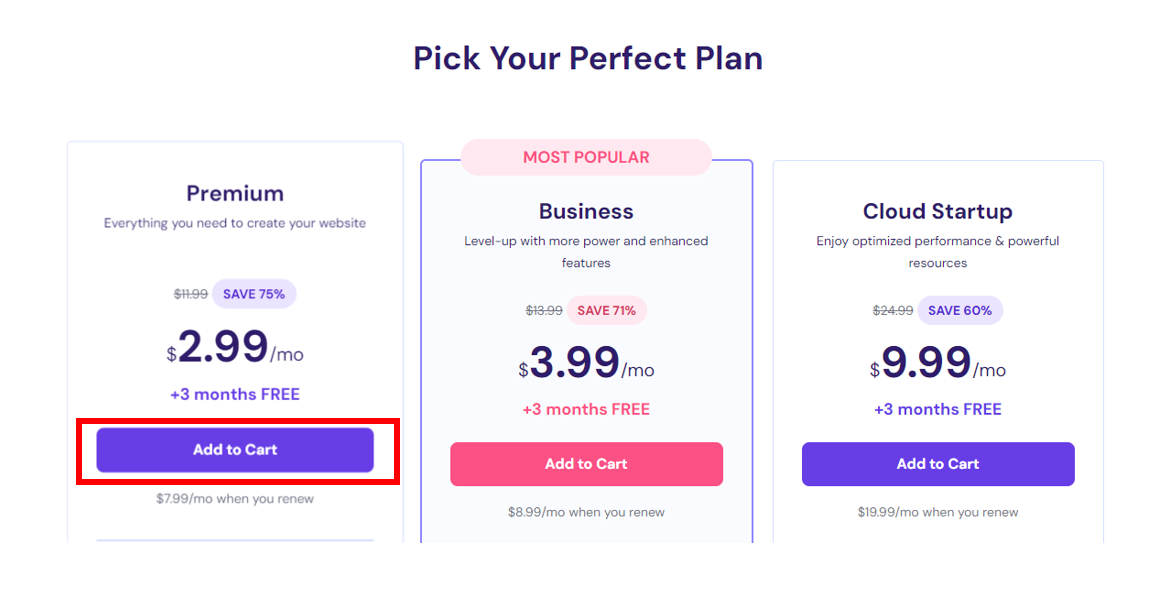
Hosting offers multiple plans for users and most people, depending on their requirements; if you are just getting started, I recommend you choose the premium hosting plan, which starts at $2.99 per month, which is less than the cost of your coffee.
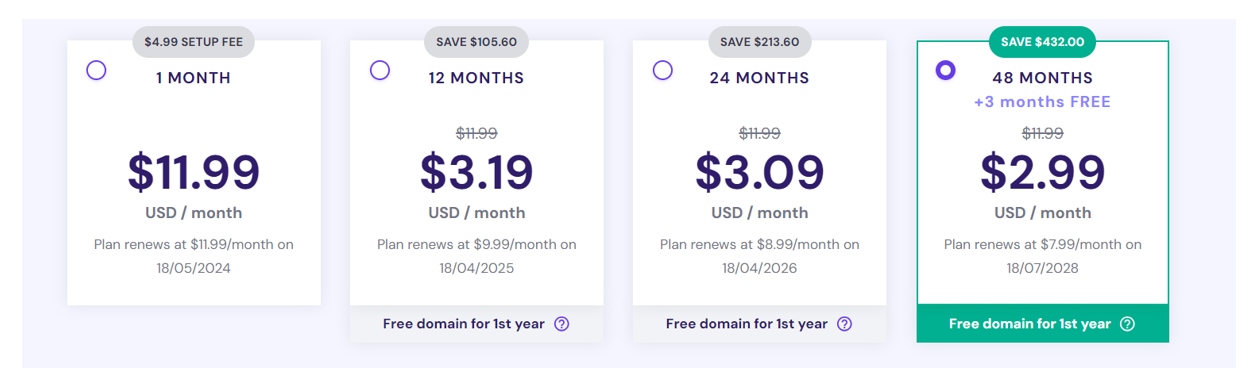
Step 2: Select the hosting period
Once you have selected the plan, you must choose the hosting period and currently hostinger offers.
- One month
- 12 month
- 24 month
- 48 month
All the above plans come with a 30-day money-back guarantee, but choosing the plan for longer will help you reduce your overall cost.
Once you choose the plan, click on add to cart. You will then land on the page where you can select your hosting plan, as you can see below.
Most importantly, you can always upgrade your plan; you just need to reach out to their support team.
Step 3: Enter your account information
Once you have selected your subscription plan, you need to enter your account information.
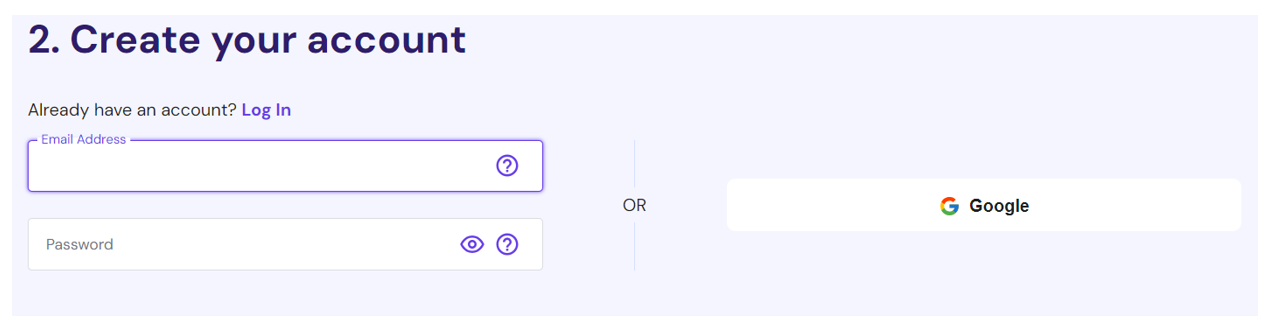
If you already have an account, you can simply click the login button.
Otherwise, you can create a Hostinger account or the simple method you use to sign up with your email address, as shown in the above image.
Step 4: Make the secure payment
After creating the account, the last thing you need to do is choose the preferred payment method and add accurate information.
In general, the payment method and currency availability will depend on your region, but these are some payment methods.
- Credit card
- Debit Card
- Paypal
- Google Pay
- Ali Pay
- Coingate
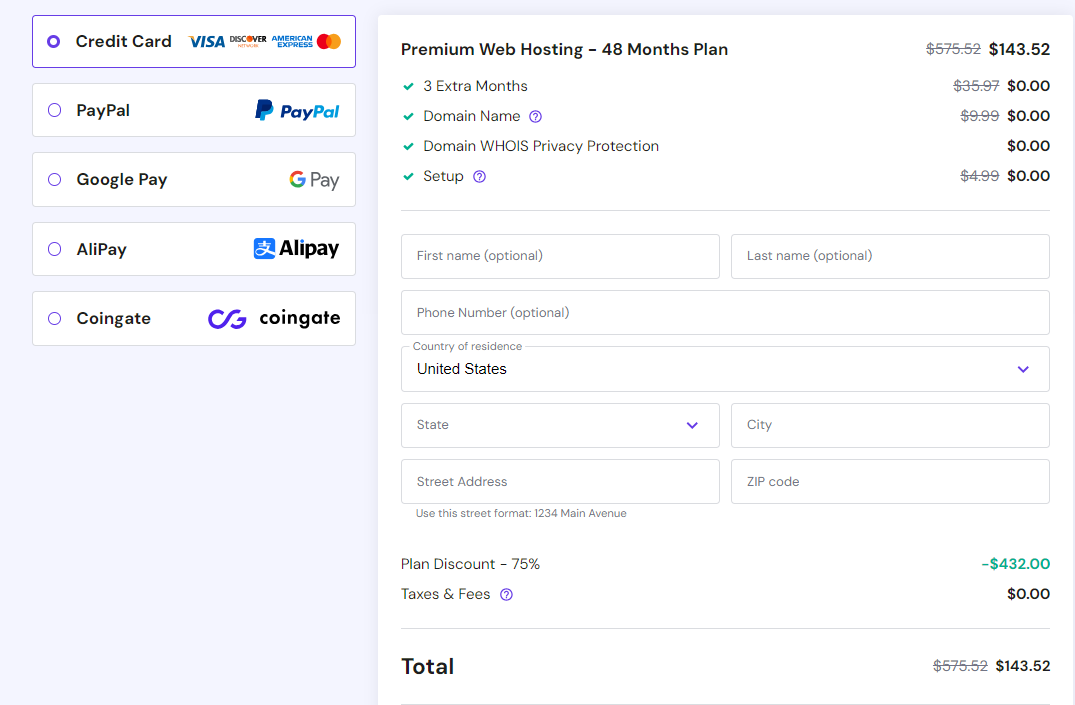
Once you select the preferred payment method, the next thing that you need to add the required information, which generally includes
- Your Name
- Phone Number
- Address
- Zip Code
After adding all the above information, you need to click on submit secure payment to proceed (before that, ensure you double-check all the information you have added).
Once you have made the payment, you will have access to your web hosting, where you will see your host websites and start your journey, which we will see in the next section.
Launch your blog
Once you have successfully completed the process of buying the hosting from the host, the next thing is to set up your account and install WordPress to start your blog.
First, you must log in to your hosting account; once you log in, you will see the interface below. Now, click on the set option, as shown in the image.
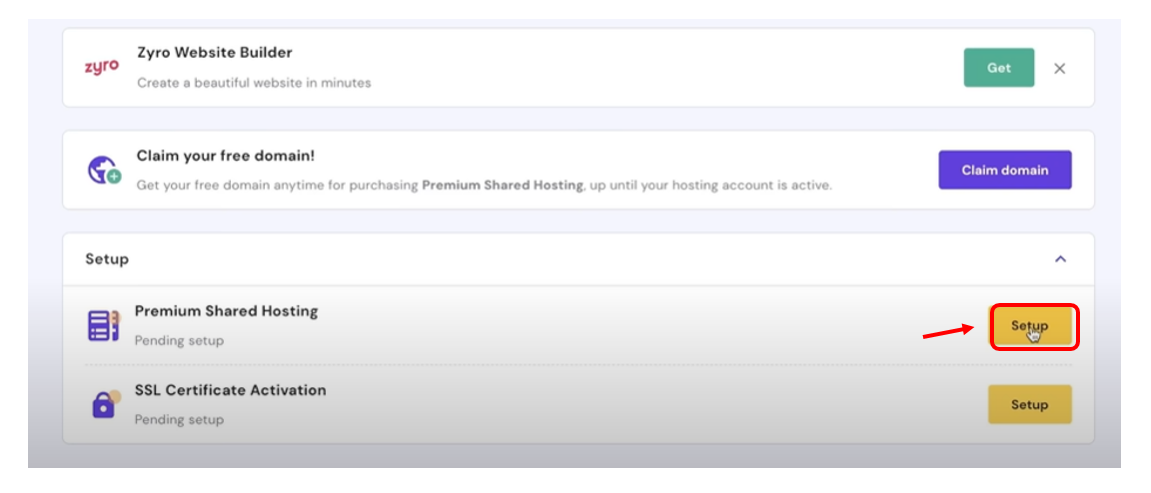
Once you click on the setup, here are the steps you need to follow to set up your blog.
- Once you click on the steps, you will see the start button; click on it, and you will see basic questions you can answer according to your preferences.

- When you finish the question, you will need to choose Platform. As mentioned above, we will choose WordPress for our blog as it is easy to use, and you can learn quickly.
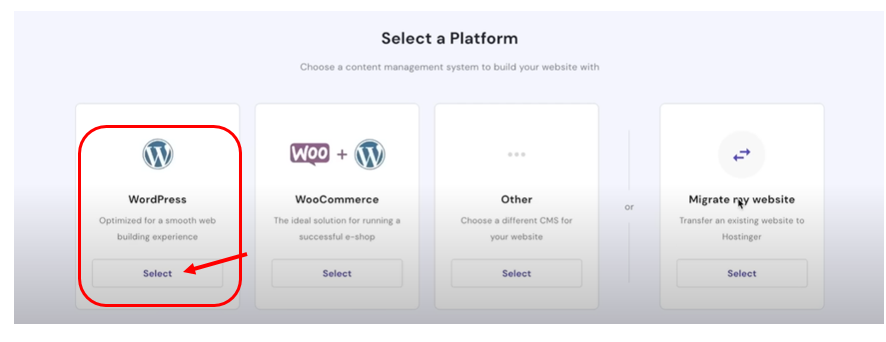
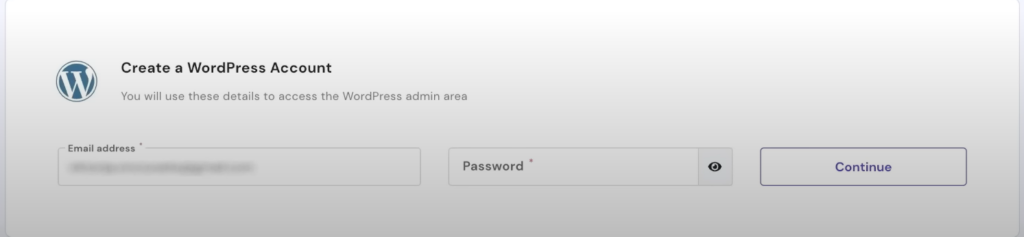
- Now, you need to create your WordPress account. All you need is an email address. Once that’s done, click on continue.
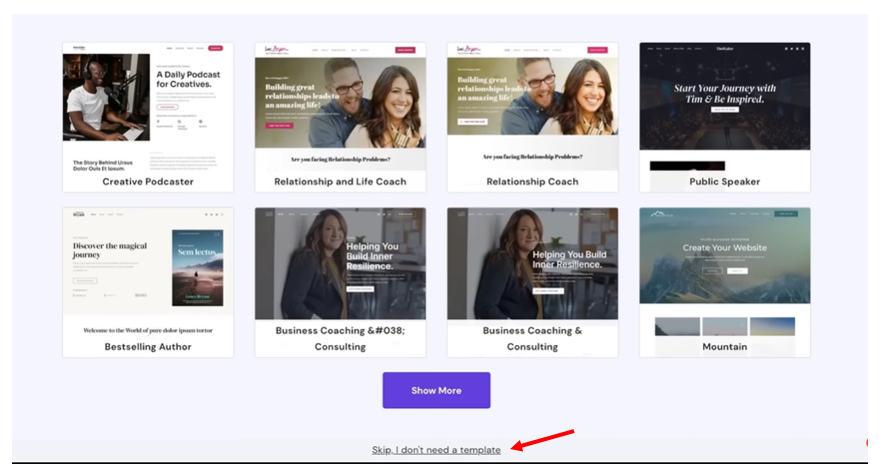
- Once you are done, you will be asked to choose the layout for your site, but now you can ignore it (we will discuss this later), click on skip, and continue.
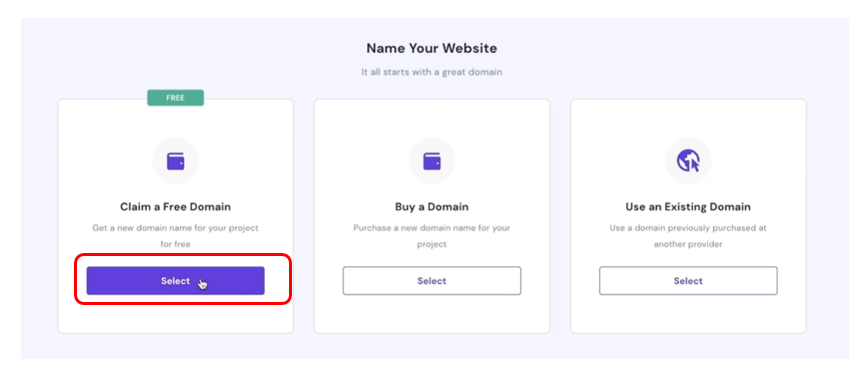
Get your free domain
As stated above, choosing the premium shared hosting will help you get the free domain name; it’s time to grab it; click on Claim it.
You need to enter the domain name (blog name) you selected in the previous process.
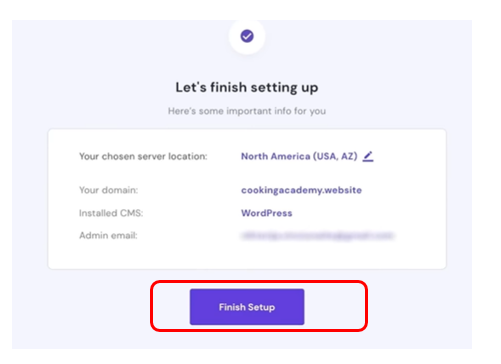
Note: If your domain name is already booked, choose something similar to that, click on continue, and finish the setup process.
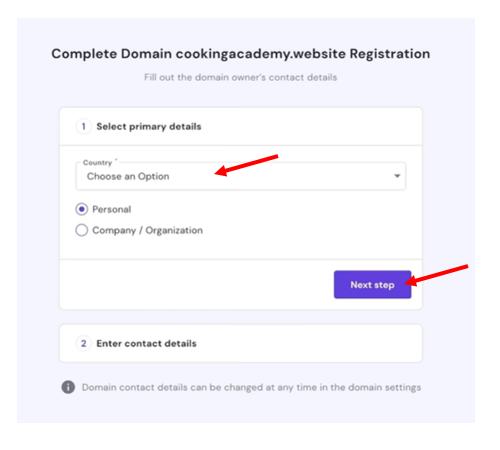
Now you have to complete the registration process of your domain by adding the basics details such as
- Your country name
- Your contact details
- Your Address
After adding all the primary details, click on complete registration; now, you will see the dashboard below.
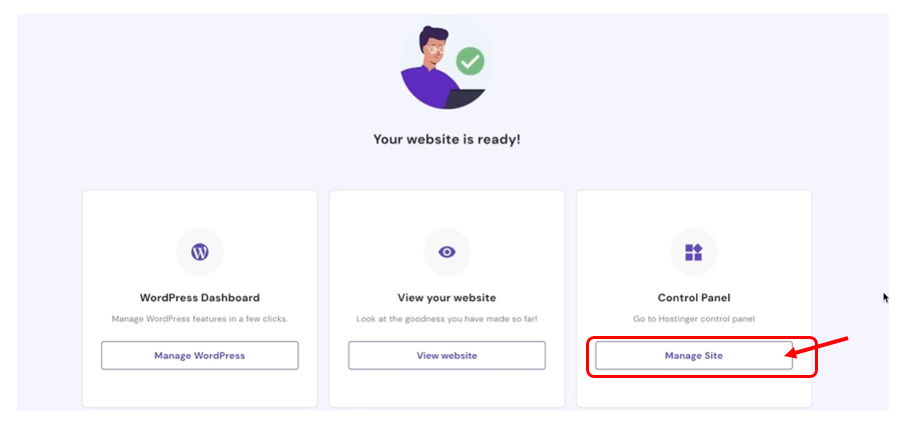
Now, we will install the SSL certification as necessary to protect our site, so it is very simple; here are the steps to do it
- Click on Manage the site
- Scroll down; you will see the SSL option. Tap on it, and you will see the option to install SSL; click on it.
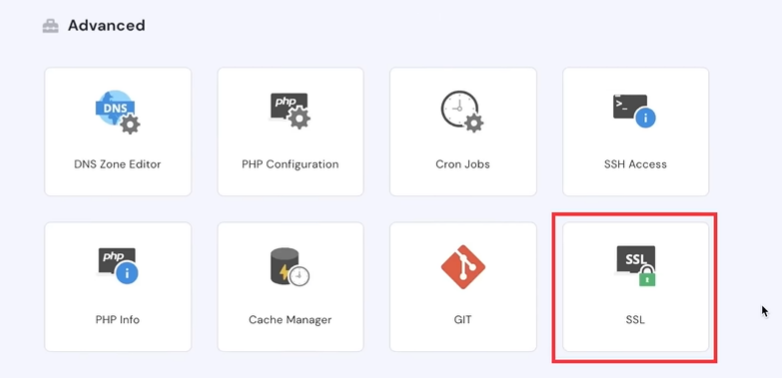
With two simple steps, you can install the SSL certificate on your site and protect it from hackers.
We have seen the steps to connect your domain with the Hostinger account so far; in the next section, we will discuss how to get started with WordPress and other things you need to start your blog
Get started with WordPress
To access your WordPress account, first head to your hosting cpanel. You will see the option “dashboard;” click on it here.
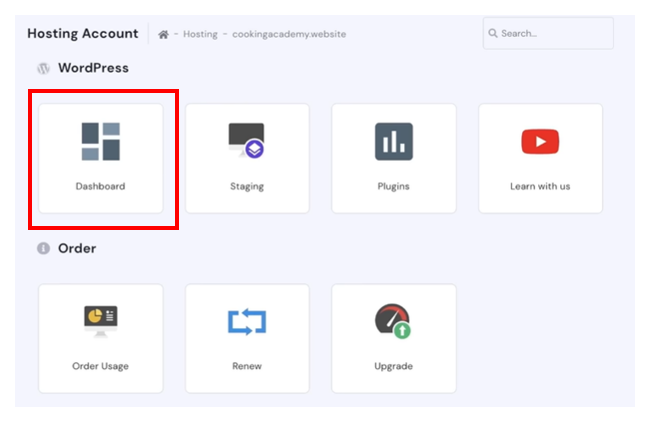
Now, on the left side, you see the option to “edit website,” and once you click on it, you will be redirected to your blog’s WordPress dashboard.
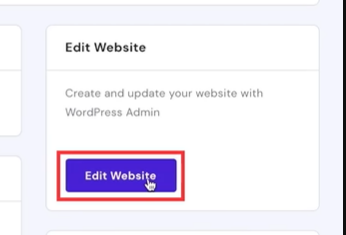
Note — Before adding anything to your WordPress, you must first save your WordPress login details.
So let’s see, move into things that you need to start to power up your blog.
Important Setting for WordPress
As you can see, the above interface is where you will publish your blog posts, make changes to your site, and everything you need.
Once you install WordPress on your site, you will find essential settings to ensure everything goes right once you publish your blog.
Go to the setting > General
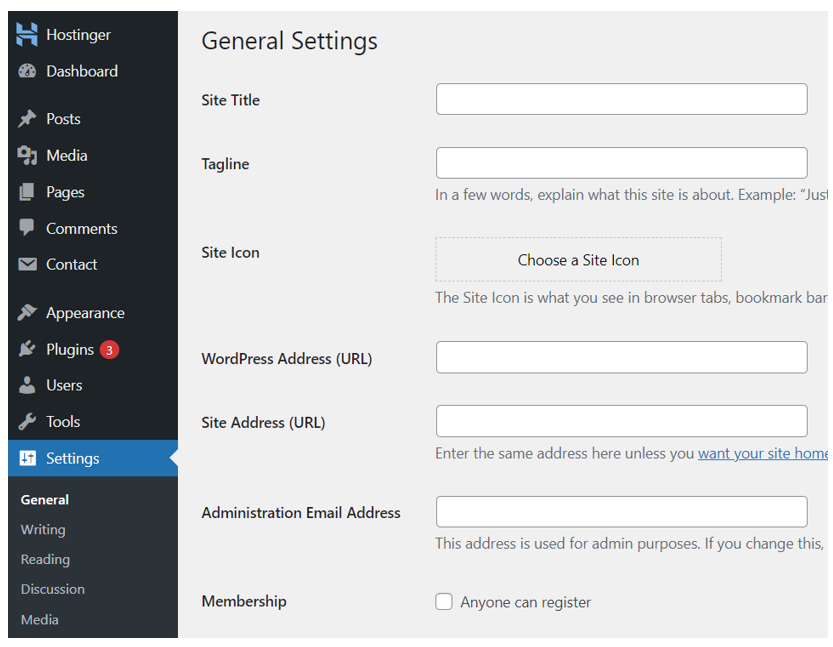
Site Title and Tagline: Make sure your website has the right site title and tagline. If you don’t have them, you can simply edit and add something that represents your brand value.
WordPress Address: Make sure your site always starts with the (HTTPS instead of HTTP) and if your site begins with http, then you can simply contact hosting chat support, and they will fix it quickly.
Admin Email: This is the email you used when creating a WordPress account. You can change it if you want, but always ensure that you use the currently active one.
Timezone: You can change the date and time as you want. There is no hard and fast rule, but it is very important, especially if you schedule your post.
The last simple setting you need to make is to go to settings> Permalink and make it to post name, and that’s it.
Pick Your Theme
After installing WordPress, the very first thing that you need to add to your website is the right theme.
A suitable theme means one that looks good is easy to customize, and loads quickly for users.
I know it may seem complicated, but don’t worry. It is easier than you think. All you need to do is give yourself enough time to understand.
Before adding the theme, you must find an excellent theme that looks impressive and is easy to customize,. WordPress offers thousands of themes that you can add.
But here are some of my favorite themes that you can add to your site.
- Generatepress
- Kadence
- Astra
Once you have decided on your theme, you must follow the below process to install it.
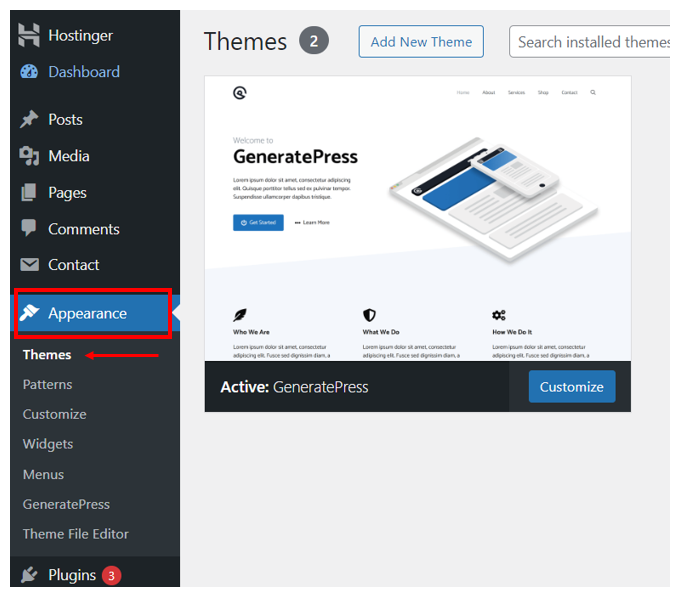
- Go to Appearance > Themes > Add new
- Search for any of them (Mentioned above)
- Click on Install Now and activate it
With these simple steps, you will be able to add a theme to your website and start your blog, but that’s not enough; there are some of the other things that you need to add, so let’s see those.
Create important Pages
Once you have installed the theme for your blog, the next important thing you need to consider is creating the important pages for it.
These pages help the users understand your blog and navigate your site easily.
Here are some of the list of the essential pages that you need to create.
Home Page —This page generally covers the purpose of your blog, a brief introduction about yourself, and some navigation buttons.
About us – This page contains the information about your blog and the information you will provide to your users.
Contact us — This page contains your contact information. If someone wants to give you feedback, they can do so quickly.
Now, to create these important pages, here are the steps that you need to follow
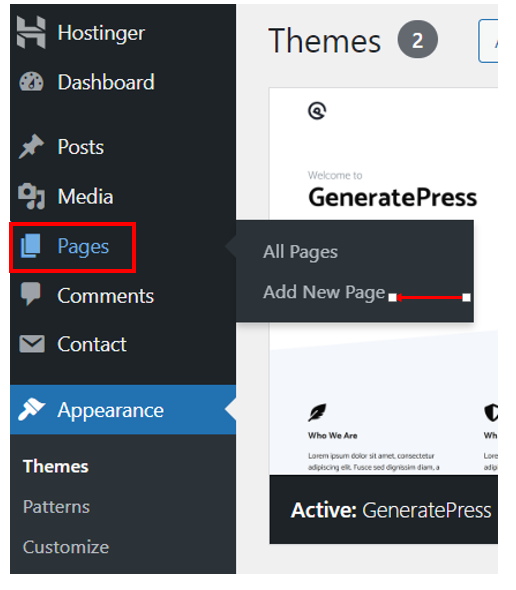
- Go to Pages> Add New> Create your page
- Give the title of your page, such as “contact us.”
- Once it is done, click on publish it from the top corner
After creating the important pages for your blog, you can delete the sample pages that are not of your use.
You can also customize these pages by adding images and other visual elements.
Add the menus
As pages are necessary to help users learn more about your blog, and menus are also crucial for users as they help them navigate to different pages easily.
The better you design your menus, the better it helps your audience spend time on your site. Not only that, but it also helps Google understand your site better.
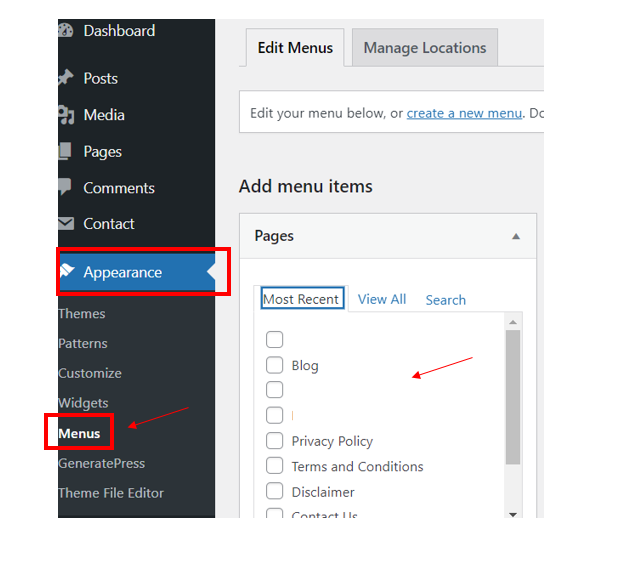
To design the menus for your blog, here are the steps to follow:
- Head over to the appearances and go to the menus
- Give the name of your menus, such as the main menu
- Click on Create Menu
- Add all the necessary pages that you can create previously.
- Arrange the menu items in the proper order
- Click on the save menu and publish the changes.
While creating the menus for your site, I suggest avoiding adding too many menu options, as this will confuse your readers and affect their experience on your site.
Whenever you add menu options, make them simple and easy for your readers to navigate.
Add the necessary Plugin
In blogging, plugins are like weapons you collect before going on to war, as they help you weapons help you power up your immunity.
In the same way, you have the proper plugins to power up your blog and make it smooth for your reader.
Several plugins are available in the market; in short, there are plugins for everything, but does this mean you need them all?
Well, the answer is no; you need to add only a few plugins to your site for better functioning. Here is a list of the plugins I used for my site.
Yoast SEO
Yoast SEO is known as one of the best plugins for writing SEO-friendly articles, and currently, it has more than 5 million installations on WordPress sites.
You can consider it your helper, which will make it easier for your website to get found on search engines like Google.
Not only that, but it will also help you improve the titles and descriptions of your website.
Table of content
This PluginPlugin is one of the best I have added to my list; once you install it, it will automatically add the different sections you have covered in your blog post.
It will help users understand what your page is all about.
If they read specific things in your post, they can jump directly into your post. Overall, adding this Plugin will help people navigate your site.
Site Kit By Google
To get traffic to your website, you first need to make it live on Google.
This plugin will help you connect your website with Google’s important tools, such as Google Analytics and Google Search Console.
Both tools will help you understand how people interact with your content and the number of visitors to your site, and they will also help you identify issues.
In short, This is the must-download plugin for your WordPress.
Contact form 7
It is another plugin that you can download. It allows you to create a contact from your website with just a few clicks, whereas manually creating one would take hours.
It is simple and easy to use, and you can customize it to your needs without any coding knowledge.
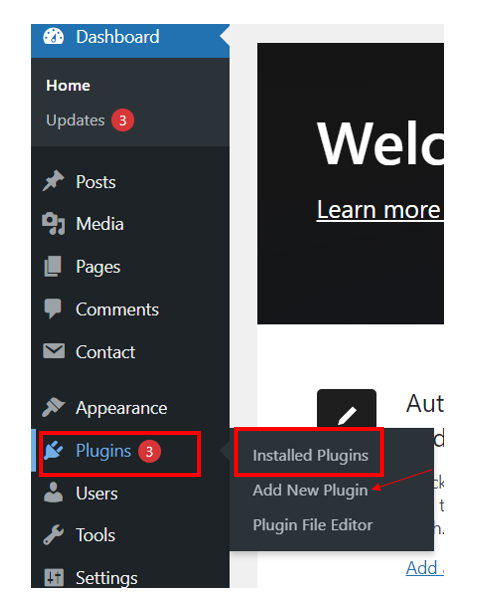
Steps to install the plugin in WordPress
- Go to Plugins > Add New
- Search for the “mentioned above plugin” on the search bar
- Click on “Install now” and activate it
Once you have installed the necessary plugin, it’s time to get on the most important step: writing the blog post.
Writing Blog Post
Before you draft your first blog post, let me tell you that it seems very difficult. It seems impossible, as I have been there and know it very well.
But let me tell you this: Your 100th post will always be better than your first post, but you need to stick to it to practice it continuously.
One more thing: don’t worry about perfection. As a newbie, you will make many mistakes, and that’s okay.
It’s part of the process. As you give the time, you will understand everything very well, from writing the content to ranking it on Google, so let’s look at the steps to draft your first post.
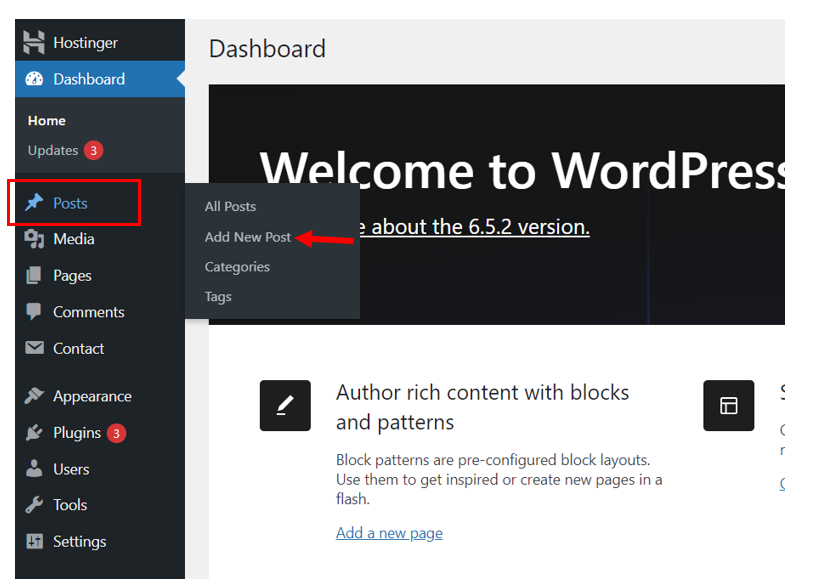
- Go to the post section from the top left corner
- Click on add new, now you will see the blank canvas
- Now you are ready to paint your canvas with your writing creativity
Put the title of the topic you want to start on and start writing. Here are some personal tips that make writing easier.
- Research the topic effectively before writing about it
- Create a clear structure before start writing on it
- I always like the way you talk with people
- Write short and crisp paragraphs
- Be consistent and write regularly.
Once you have drafted your post, check the preview – you will see the option on the top right corner with the name “preview in new tab.”
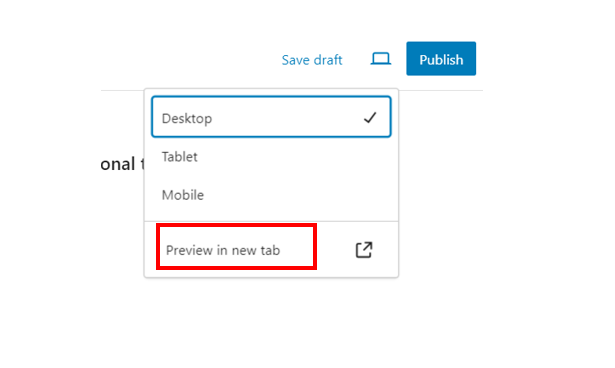
You can edit the post and add what you want if you see any mistakes. It is easy and won’t take more than 2 minutes now. Once you have checked everything, you must hit the “publish button.”
Congrats !! You have successfully drafted your first post on your website, which is live online.
Conclusion
The above post provides a clear idea and roadmap for starting your blog. I have shared the exact process that helped me become a successful blogger.
I don’t think I have to repeat that blogging can change my life, but it’s the truth, and it has changed the lives of millions of people.
Everyone wants to live their dream life and do what they want with their lives, and I have no better opportunity than blogging, which can give you time and freedom.
So, what are you waiting for? Start your blog today. No matter what you use the internet for, you can start a blog on anything and make money from it.
Lastly, I would say you should try it as it costs a lot, and if it works for you, it will create a fortune, and you will become financially free.
Last tip: Be consistent with posting. Happy Blogging.
Hey people!!!!!
Good mood and good luck to everyone!!!!!